Winter and early spring are ideal times to get out an take part in a very challenging, but very rewarding activity: Bird photography.
Location
A great place to start with bird photography is right in your own yard. You can put up feeders in locations where the birds have some cover and in a short time, you will have winged guests in your yard.
This is a commitment because once you start putting food out, your feathered neighbours start to depend upon you. Also expect that the presence of food may bring you other neighbours as well including highly acrobatic and dedicated squirrels, perhaps raccoons on a break from safecracking your garbage cans, as well as the odd skunk or opossum.
If you have a deck or even an unobstructed window, you can set your camera and lens on a tripod and just be ready. If you photograph through a window, be sure to invest the time to clean the glass on all surfaces with diligence and check for reflections that could affect your shots.
Preparation
Birds are naturally skittish around people. As such, being slow and methodical in your movements will help you a great deal.
If you’re photographing in winter time, keep in mind you will be out there for some time, so dress properly. Wear proper boots, gloves and keep your head covered.
If you’re photographing in the spring, plan for wet and often muddy ground and for cool breezes particularly before the leaves come in. Once the leaves have opened completely, bird photography gets a lot harder.
Equipment
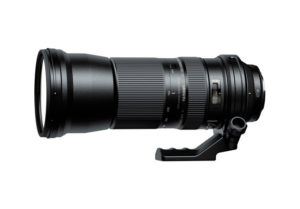
Tamron 150mm – 600mm super-telephoto lenses are excellent for bird photography.
This is one situation where there is no substitute for a long lens, and by long, I mean really long. Both Sigma and Tamron do superb lenses in the 150mm to 600mm zoom range and you should expect to be shooting near the maximum all the time.
Handholding a 600mm is a challenge and for photographing birds in flight, you will be looking for a shutter speed that is nice and high for sharpness. I suggest striving for 1/1600 or so to start. You can shoot wide open, the bird is likely to be far enough that depth of field is not an issue, and don’t be afraid to raise your ISO to get those high shutter speeds.
Even with lenses with some form of stabilization, the size and weight mean you need high shutter speeds for sharp images. No matter what subject you are shooting, choosing the right equipment for the job is key and it does not have to be expensive. Even if it means buying a second-hand lens or camera, owning photography equipment may not be as pricey as people initially thought, especially when at a beginner level.
While you can shoot handheld in many cases, a tripod is going to be an asset even if only to take the load off your arms, shoulders and neck. Professional bird shooters tend to swap their ball heads out for a special head called a gimbal that makes for super smooth pans, rises and falls. I strongly recommend carbon fibre leg sets because they are lighter and handle getting bashed around better. They are also easier to clean when you set the feet down and the legs sink six inches into a muddy bog. If on a budget, the Cameron CF550 is a superb carbon fibre tripod with a very decent ball head. For a gimbal head, there are good choices available from Jobu and Wimberley. A good gimbal head is not inexpensive, and you might want to see how important bird photography is to you before making the investment. A word of caution though, once you have gone gimbal for birds, shooting off anything else becomes a case of lunch bag letdown.
Until next time, peace.
COMMENT (1)
Pingback: What to Look for in Binoculars | Henry's Blog