You’ve got a vlog, or you’ve been empowered by your company to do some face to face interviews with interesting people. You’ve got the right content, you’ve got a script, you’ve got a plan and you know about Lights! Cameras! Action!
Yeah, About Those Lights….
When you want your videos to look professional, but without dropping a bomb on lighting, that doesn’t mean that you go without lighting. So called “natural light” nearly never looks natural or all that flattering. We know that successful videos make the talent look good. To make a professional looking video, you really must have lights.
Oh man, is this complicated?
It’s not complicated. Actually, it’s really easy because what you see is what you will get. Lighting has three key elements. They are colour, direction and quality.
Colour is obvious. Light that is the wrong colour looks lousy. Incandescents make people look jaundiced, fluorescents make people look green and when you have a combination of window light and light made by humans, everything looks like crap.
Direction is simply the direction that the light is coming from and influences how shadows fall. Light from overhead, puts shadows in the eye sockets, under the nose, and under the chin. If the talent has bangs, it makes shadows on the face, and if the talent has little hair up top, it turns the cranium into a glow spot. Yuck. Lighting from below is Frankenstein’s monster and harsh side lighting can make noses and chins look enormous. Better get a handle on this direction thing.
Quality is the description of how soft or how harsh the light is. Softness is almost always preferable in an interview. Harsh or hard lighting enhances shadows, wrinkles, blemishes as well as the size of ears and noses. It also puts a really sickly shine on skin. It looks horrible. Soft light means a big light source and soft shadows that are flattering and reveal the people on screen. Soft is better, so we had best figure out how to do that.
Two Lights – that’s all you need to get started
The kind of light that we will use is called continuous light, simply because it means always on. We want lights that give consistent colour, are directionally controllable and that can be made soft. Fortunately, this does not have to be expensive, especially for the most common kind of interview called a two-up.
To do this, all you need in addition to your existing camera and audio setup is a pair of LED panels. You’re going to want larger panels because the larger the panel the softer the light and the less finessing you will have to do to get the light right.
When looking for lights, you do not need to spend a lot of money. The light in the graphic below is a screenshot from the Henry’s website. I like these lights because they are flexible panels, you can roll them up for transport. Westcott did their own unique panels a few years ago and they were a lot more money for smaller panels.

Alternatively, if you are on a really tight budget, I have used these lights for one-up and two-up sessions with great success and they are super inexpensive. The only thing to keep in mind is that they are not as bright as the larger and more powerful flexible panels.

Just remember to get a couple of decent light stands to hold the lights. Flimsy is bad. The ones at this link are excellent. They can go up to 10 feet high and are air-cushioned. Trust me, you WANT air-cushion stands.
Your Setup
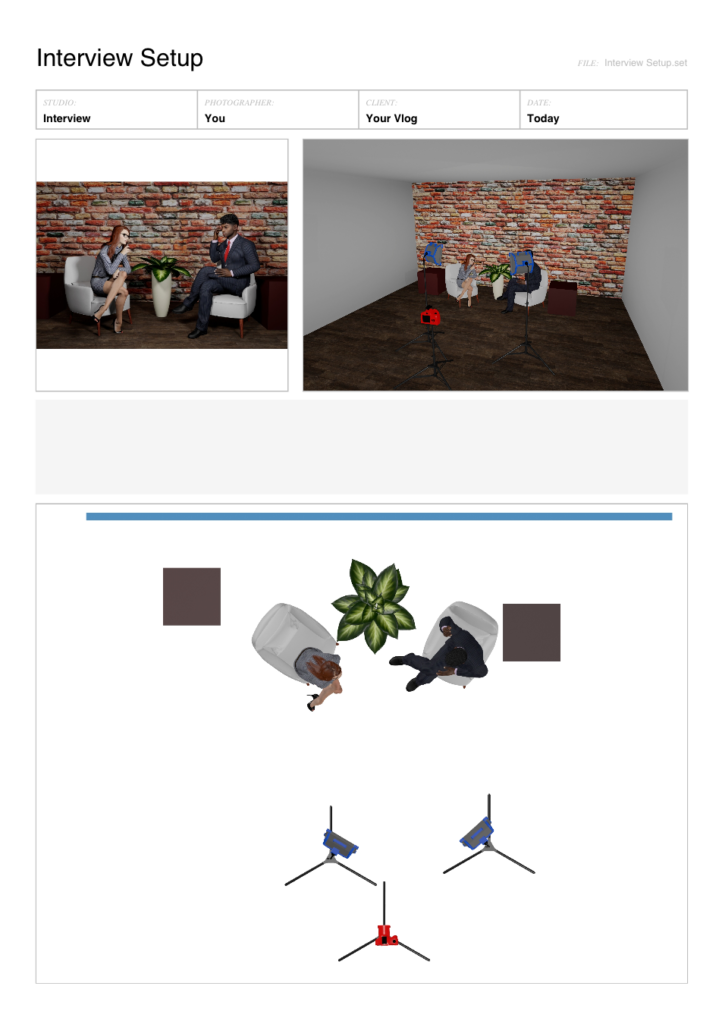
I’ve created a simple template for you using my studio simulator. We have two people in the interview, a very basic background (no matter where you shoot, keep the background simple so it doesn’t distract the viewers) and two lights. I put the people in chairs because that is a more relaxed mode of doing an interview.
On the setup page, you can see that the camera is on a tripod and the lights are to either side, aimed across the set so the light on the right is set to illuminate the person on the left and vice versa. I put a plant in the middle to hide some minimally distracting shadows. That’s not required.
Bring the lights in fairly close but of course keep them out of frame. Using your eye, aim the panels at the faces of your talent. That’s where you want the viewer to be looking.

Light Shapers
You can look at accessories for your lights to further soften or control direction. If you go with the flex panels, the softbox / grid kit is an excellent thing to have with you. These things are fantastic and the value for the price is incredible.

You really don’t need anything else. If you find that you get too much spread (light going into areas where you do not want it, you can make really inexpensive cutters with black foamcore and attach them with gaffer tape.
Conclusions
A pair of simple lights on stands, positioned well are going to do a great job of helping you make your interviews look really professional. You don’t need a tone of space and you really don’t need a ton of kit either. The only thing we didn’t talk about today is audio, but I have covered that in other articles for the Henry’s blog. If you have questions about this subject, please leave a comment on the Henry’s Blog


