When planning a studio portrait session for a friend or client, we often can get bogged down with concerns of the specific gear we will need to create a look we’re trying to achieve. We may find that we don’t have the gear on hand to produce that ‘big soft light’ or perhaps we feel compelled to make things somewhat more difficult than they need to be.
With this in mind, I’m dedicating this blog entry to the concept of using simple techniques to get quick and easy results. You may be surprised at some of the things you can do, often with simple gear that you already have.
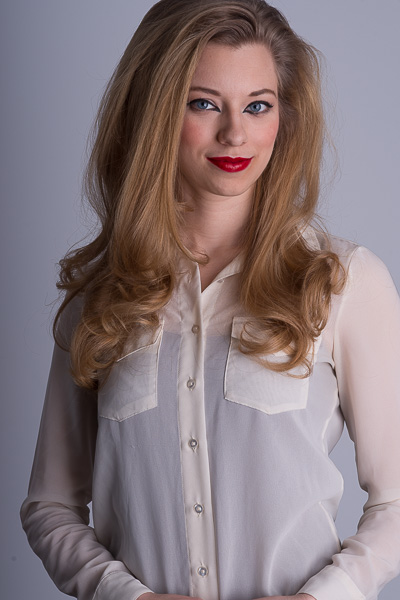
Let’s start with one of the most common concepts; a high-key portrait. High-key refers to the bright white background that appears behind the subject, which should be completely even from corner to corner of the portrait.

Getting a high-key look can sometimes be a challenge. If you are photographing your subject from the waist up, you may find a single light hitting your background may not provide the even edge to edge result you’re looking for. You may find yourself in need of a specialized lighting modifier and mini light stand that positions the light behind your subject and fills the background properly.
But what if you don’t have these items? Does it make sense to go out and buy the light modifier you need? That would of course be for you to decide – such a modifier can be a very often used and flexible tool. But you don’t absolutely need this modifier to be successful with this shot.
Enter, the softbox. Every portrait photographer is going to have one, and it should be at least a medium sized unit. The utility of a softbox cannot be overstated, and this tip will show you yet another use for your softbox that you might not have thought of.
To achieve a high key background, simply place your softbox behind your subject, and tilt it at a 45 degree angle. The softbox will be facing directly towards the back of your subject. As you photograph your subject the softbox will act as a high key background. The very design of the softbox will guarantee that the background is evenly lit from edge to edge.
Be cautious when setting the power level for this backdrop softbox. Too much power will give you a washed out lens flare effect that will diminish contrast. Experiment with a power setting that is a stop or two, maximum, over the power of your key light.

You might ask ‘what if I am using my softbox to light my subject?’ Your other options for creating a soft light include umbrellas, but you can also use this next tip to cut corners and create a big, soft light for lighting your subject instead of a softbox.
One great trick for making a big, soft light is to tape two 4 x 8 boards together into a “V” configuration. When taped together, they can stand completely on their own. These boards are very inexpensive and come with black or white finishes. For this trick, you will want two white boards. Place two strobe heads (one will do in a pinch, two will provide a taller, more filling light) in front of the two boards and aim them into the middle of the “V”. Place the heads at different heights when aiming into the boards to provide a nice even top to bottom light.
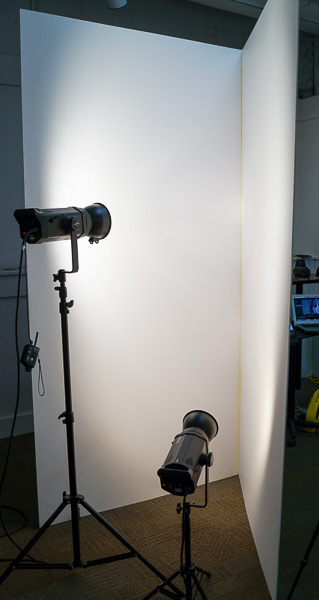
The light will bounce into the boards and create a very softbox looking type of light. In fact, using this trick effectively creates a HUGE softbox in a pinch. The only drawback to this arrangement is the light will be somewhat less controlled than a softbox, but you can’t argue with the results. It is important that the boards be as pure a white as possible, otherwise you will get a colour cast of whatever colour the boards are, which you definitely don’t want. This same trick can apply by simply bouncing two strobe heads off of a clean, white wall. This will produce a very scattered soft light which will spill everywhere. If you are not fussy about the amount of spill light that bounces around your studio, this is a great trick to use as well. Keep in mind that you can use two black boards in a “V” configuration to block out unwanted bounce light wherever you place them.