These days there are numerous methods to deliver live streaming on the internet. Some people want to watch things live, whether they are events or behind-the-scenes content. Live streaming offers long-distance communications in real-time, for corporate, or social events, e.g. services for houses of worship. In some cases, people want to watch something which they are not able to stream as they do not have a subscription, luckily a Pirate Bay proxy can be downloaded to get through this, resulting in them being able to access previously restricted websites in their area.
One of the challenges is the connection between your advanced or professional camera or switcher to the web. Depending on the level of sophistication you desire, there are multiple routes. At the simple end, there is getting high quality content onto Facebook Live or YouTube Live, where you do not have to create the channel, the bandwidth and the moderation engine.
At a more complex level, you may want to have more sophisticated interactions with viewers; chat, polls, surveys and the like. You may also want to avoid the ad embedding, be able to keep your channel more private or provide a pay-to-play offering.
In this article, we are going to start with the very simple route to internet broadcasting, that is, leveraging an existing distribution service, but doing so from your computer or phone without having to build a lot of infrastructure.
The big problem with Facebook Live or YouTube Live isn’t the service, it’s the quality of the input stream. Using your smartphone or the camera built into your computer can work, but the audio is usually horrible and the video is on its best day limited by the camera, complete with distortions, lousy focus, and a tendency to perspective exaggeration. It works but screams amateur hour.
Organizations that have done video for a while, as well as those just starting out, probably already have one or two video cameras, perhaps more. The simple distribution methods make more than one camera tough to use, but with the tips contained herein, you can be live with minimal prep time. We are going to focus on live streaming, not recording locally, in this article.
If you only have one camera and one audio source, this is easy to do. Route the audio through the camera, and use the HDMI out from the camera as your signal source. If you have more than one camera and more than one audio source, you will need a switcher that allows for transitions as well as the ability to insert media loops and perhaps even do green screen keying. In the past, switchers were expensive and not particularly intuitive. This has changed. Small AC powered switchers that have front panel controls as well as computer screen controllers are available.
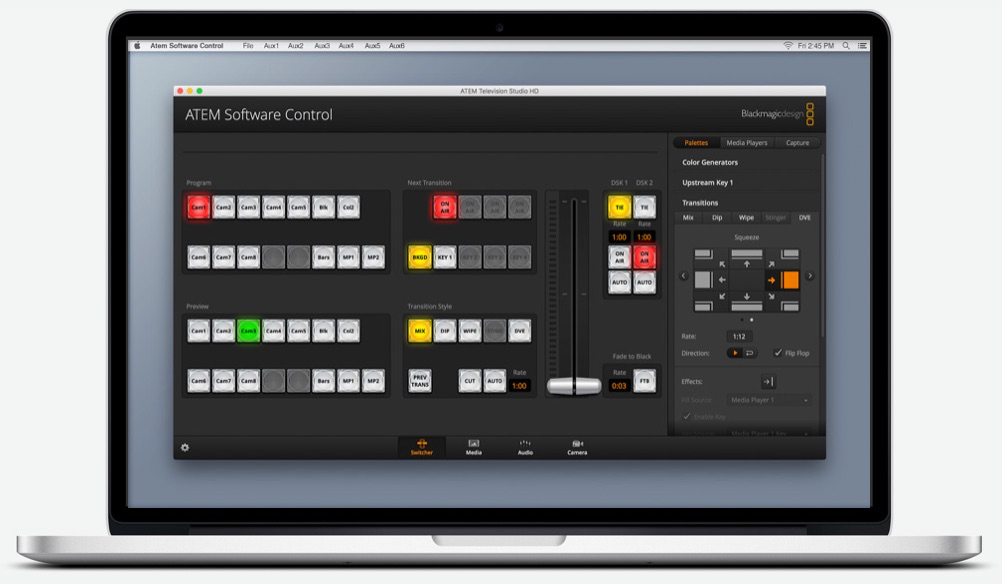
One switcher that I use myself and recommend is the Blackmagic Design ATEM Television Studio HD. It’s small, easy to set up and easy to use offering both HDMI and SDI inputs as well as SDI and HDMI outputs. Prosumer and consumer cameras will all have HDMI out; most pro cameras offer both SDI and HDMI. The switcher has illuminated channel buttons, that change colour for On Air and Preview.
Each channel has its own audio feed, and you can control the audio independently. You can transition from the front panel, or via the virtual T bar on the computer interface. There’s even a small display on the front of the unit so you do not need a big display attached. If you do attach an HDMI display, the unit will show you MultiView, the feeds from all cameras so you can switch between them. Using a switcher does mean that there is a switcher operator needed, but this process is easily learned.
This unit is a Full HD capable switcher. There are 4K variants as well, but as we are talking about live Internet streaming I’ve chosen the less expensive Full HD model.
I particularly like being able to switch remotely from the computer or my iPad. This way I can put the physical switcher closer to the cameras, particularly for the limited run length of HDMI feeds, but still control all the functions from the computer.

Figure 3: The onscreen interface of the switcher. There are also options for Media, Audio and Camera Control.
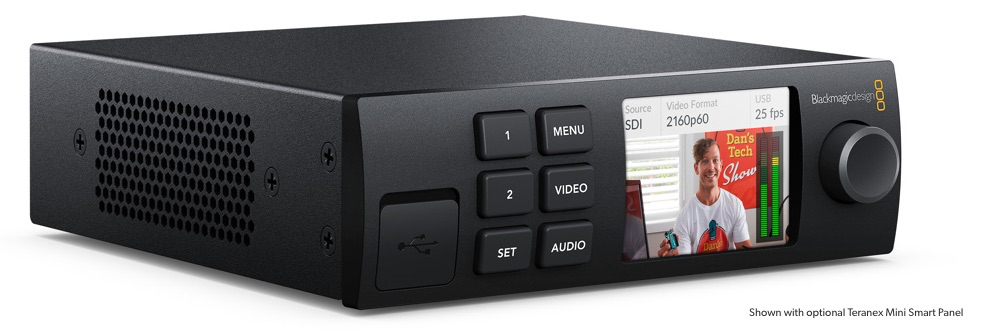
Getting your feed, whether from a single camera or a switcher to the Internet has been something of a black art in the past, but Blackmagic Design made this incredibly simple this year with the Web Presenter.
The Web Presenter that connects to your computer via USB and to the computer looks like it is a webcam. No special drivers, no wonky configuration, just plug and go. On the input side are both HDMI and SDI inputs, an HDMI out, plus SDI Program and Loop outputs. There is an XLR microphone input as well as stereo audio inputs. It even has a simple two channel switcher built in!
What makes the Web Presenter so special is that it includes Blackmagic Design’s acclaimed Teranex downconverter. Whatever you feed it, including up to 12G SDI 4K, comes out the USB port to the computer as perfectly synchronized 720p High Definition content, perfect for web broadcast.
The device also works with other webcam capable tools such as Skype. Because no drivers are required, the unit works with Windows, Macintosh and Linux right out of the box. The unit runs on AC power and is very small, meaning you can load it in your bag and take it with you.
Given the higher quality video and audio signal, your broadcast immediately surpasses the quality of the general Internet streaming options. If you want front panel control options, as well as a small screen showing what the unit is sending, you can add the very inexpensive Teranex front panel. I did so on my own unit and feel it was worthwhile.
Thus, whether you want to stream business meetings, sales training, school performances, house of worship services or even build your own community channel, you can do so with optimum quality, using cameras that you already likely own. This is a rapidly growing space, don’t be left behind.
Thanks for reading, and until next time, peace.


