If you’re like me and have a passion for lighting, events like TIFF tend to bring out thoughts of trying something different or new.
This week I decided to dig out an old theatrical optical spot that I have had for many years. I hadn’t actually used this piece of gear for a while, and it was time to shake the dust off of it and put it to use.
Lighting is a fun and challenging component of studio work (and outdoor work, too). There are so many ways to create different moods, a different look, or set the tone for the subject that you’re photographing.
Lighting
An optical spot is based on fresnel (the ‘s’ is silent) spotlights that are used for stage lighting and in movie work. The unit contains two lenses, and the distance between these lenses can be adjusted easily with controls on the housing. A strobe light is mounted on or positioned through an opening in the back of the casing. When the light is switched on, the beam passes through the two lenses and out the other side.

The light becomes completely focusable, allowing you to actually create a sharp edged beam with virtually no feathering (if you want). You can adjust the size of the beam by moving one of the internal lenses. Drop in ‘gobos’ (cookie cutter like pattern discs) can be inserted into the middle of the unit to project shapes such as window blinds, stars, or others. The unit even has four movable metal leaves that can cut across the beam, allowing you to shape the entire beam into a square, triangle, or even a small slit of light that can run in any direction. It’s very, very cool, but they aren’t terribly easy to find.
Because the light is passing through glass lenses and is focused through them, the light does not drop off as quickly as when using a traditional light modifier with no lenses involved. Think of something like a telephoto lens for light. The look of the light that you get is very distinct and crisp. Fresnel lights were typically used for creating Hollywood golden era portraits, although the lights used were ‘hot’ lights and not flash units since they did not exist at the time.
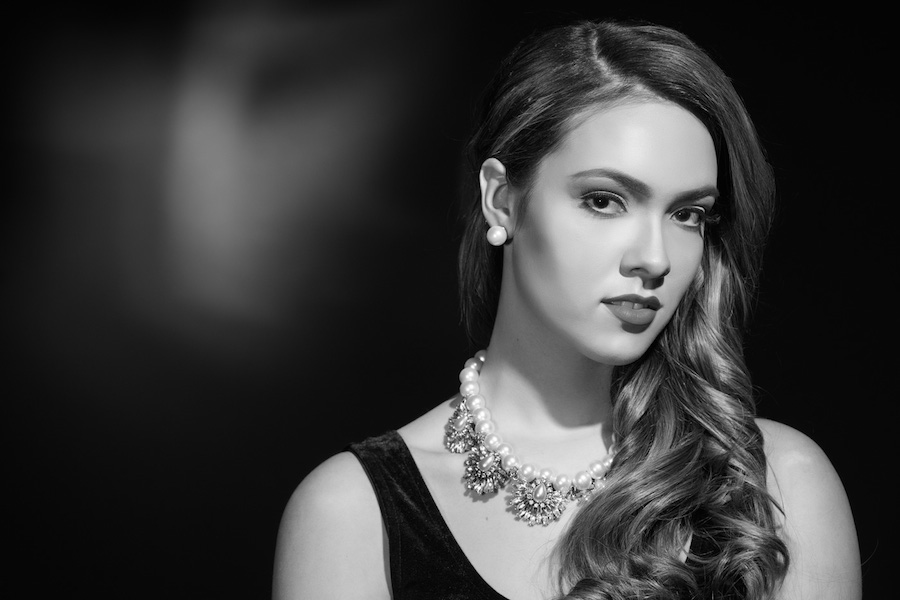
So then, prior to teaching one of my lighting classes I thought it might be fun to try to create something with a black and white treatment, Hollywood glamour style, using this light as the primary source. My model was the lovely Abbie from Sutherland models, and makeup/hair was created by Eunique at Faces by Eunique.

Setting Up Your Camera
Our focus was to create a black and white image. Whenever I shoot, I always shoot in the RAW file format. This is the optimal format for retaining maximum sensor data and have more freedom to make corrections and retouch the image. However, RAW image data is always in colour. So a black and white conversion process would need to occur at some point after the shoot.
A nice little trick that you can use in this situation is to find the ‘picture styles’ or colour treatment options for your photos (camera manufacturers call these settings varying things), and find the setting for black and white. Using this setting when shooting RAW files will allow you to see a black and white preview on the back of your camera, but this preview is just a tiny JPG file embedded in the full RAW file. The RAW file itself is still in full colour. Seeing this black and white preview while you shoot will allow you to get an idea of what your image will look like when you perform a black and white conversion after the fact. Your other option is to shoot in JPG with the black and white option activated, in which case the file will indeed be black and white – what you see is what you will get.
Preparing the Shot
Three lights were used for the image. The main light, which was the optical spot, was placed high with a sharp downward angle. The light was focused on Abbie’s face, allowing it to catch most of the light. With the optical spot I could have made the light much small, more isolated, and created something a little more mysterious. Perhaps next time! Abbie wore a simple elegant black dress, and we finished off the styling with a necklace and earring set that was very inexpensive, but looks good on camera.
The second light was a simple fill light, used to lighten shadows slightly. If I had not used this light at all, the darker shadow on Abbie’s neck would have been pure black. I didn’t want to lose the shape or definition of her neck. This light was a single strobe with barn doors to keep the light from spilling out to the sides (and into my camera lens).
A third light was used to cast a small random pattern on the wall. This light used a 10 degree grid, with pieces of tape randomly placed to cover some of the grid holes. The net effect is a bit of random pattern, some ghostly edges and just something ‘different’. I was careful not to use the modeling lamp for this light as it would have melted the tape very quickly. Never a good idea to let anything burn on set! The light was placed fairly close to the wall to give the light a defined shape. If it were too far away, the light would spread and lose it’s shape altogether.
Post Processing

The great makeup and hair work took some time as it always does, and came out beautifully. The actual shooting time was approximately 20 minutes. Once I had the image selected that I wanted to convert, I performed some retouching steps in Lightroom and Photoshop.
After the detailed retouch, I performed a black and white conversion in Lightroom using the built in black and white filter options for adjusting the tones. The conversion process, while simple, is a matter of taste and desired outcome. There are many settings to manipulate that will have a dramatic effect on the overall look of the image.
Creating this black and white ‘film noir’ type look does not require the use of an optical spot such as the one I used. The key is to have tight control over the spread of the key light, so barn doors and gridded lights are the basis of the look.
Want to Learn More?
The Complete Lighting and Shooting Workshop is a six-hour comprehensive learning and shooting experience for photographers eager to learn about and practice using studio strobes (flash units with modifiers) with live models.
You will get real hands-on experience with an array of professional lighting equipment, and work with a professional model to greatly enhance your portfolio. You will learn valuable skills for creating your own lighting using studio gear, and how to achieve certain looks for portraiture, beauty, and fashion.