Product photography is very important to companies because it helps their product stand out and look professional. Bad photography will turn off potential customers so high-quality work is important. Remember that creative product photography will help grab a customers attention so don’t be afraid to pitch some different ideas to the business. All in all, product photography concepts are consistent, regardless of the product. However for this tutorial we are going to specifically look at products that are manageable in size and will fit on a tabletop. The good news is that what you learn here, is applicable to any product. I’ll make the assumption that you have been at photography for at least a while and be familiar with certain terms.
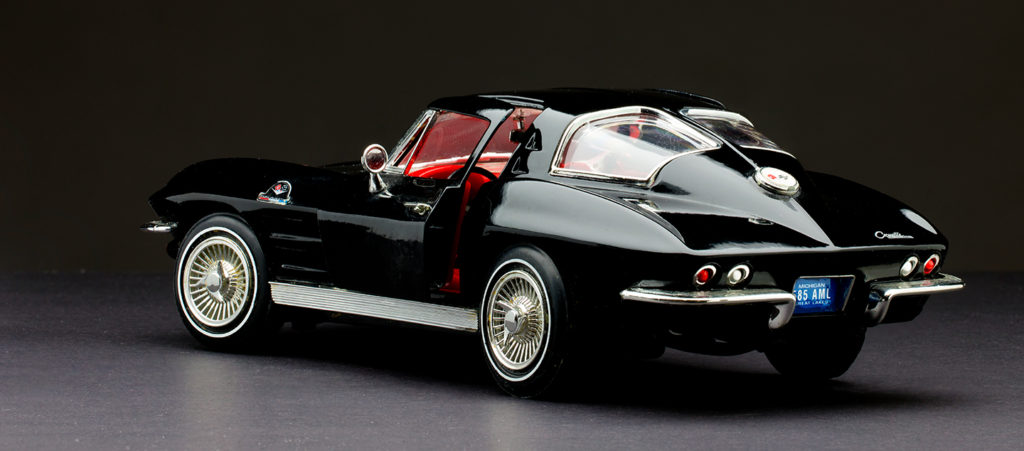
Figure 1: A work in progress example of a product shot
In Product Photography, Lighting is Everything
The light defines the image. Let’s quickly reiterate the three parts of lighting that we must always consider; quality, direction and colour. Quality defines the relative hardness or softness of the light. Most of the time we want soft light, but not always. Direction means where does the light come from, where does it go and what does it do to the subject on the way. Colour is literally the colour of the light, because consistency in colour is critical to a successful product shot.
Define the Goal
Know your desired outcome. Have a plan and work toward it. This can be a storyboard or a lookbook or simply the desire to copy the style of a shot that you have seen. No goal, no success.
Gear
Product photography is not about the gear that you have, but not having suitable gear is going to make it very difficult. I’m not referring to one of those “sell it on eBay” photo boxes. They can work fine, but are for really quick work, where you just want a softly lit subject and not to actually design the shot.
This is not a complete list, but it will get you well down the road:
- Camera body using interchangeable lenses set to shoot in the best possible shooting mode, recommend RAW with lossless, if any compression
- Camera set to Manual mode and the lowest native ISO
- Appropriate focal length lenses to achieve style and look, dependent on the goal
- Solid tripod with ball head
- Levelling method, either digital in-camera or hot shoe mount bubble level
- Working table capable of supporting the weight of the subject and one that gets high enough, so you do not have to crawl around on the ground
- Remote triggering system – cable, wireless, app
- Backdrop system suitable to the goal
- A general-purpose photo editing application such as Adobe Lightroom
- Adobe Photoshop or equivalent that can do focus stacking
- HDR software
- At least three lights – these could be speedlights, studio strobes or continuous LED lights
- Flash meter and or ambient light meter
- One solid light stand with a boom arm and a sandbag per light
- Roll of Gaffer tape
- Roll of Savage Translum 1 stop diffusion material
- Collection of A clamps in different sizes
- Large HDMI capable display for checking your shots with a cable or tethering system
- At a minimum a grey card; recommend ColorChecker Passport or SpyderCHECKR
- Hoodman loupe
- Assortment of white foam core to use as reflectors
- Justin clamps with angle mounts and stands
- Display calibrator
Lighting
Control your light by defining it yourself. Flat light is boring and creates two dimensional images. You want shadows and textures and direction to create dimensionality. You also need to know the darkest part and the lightest part of your subject and to determine the dynamic range between the two. Use your in-camera spot meter to measure each and figure out the range. The exposure readings will not matter because they will be wrong. You just need to know the range. If more than 7 stops, make a note. Your work just got harder as you will be doing high dynamic range (HDR) shooting via bracketing.
Your lighting goal is to make the product look awesome whether you are shooting a pencil, a food processor, a personal entertainment device or a motor vehicle. You must design your lighting to highlight the shape, the lines, the mass (or lack thereof) and the differentiation of your product. If your lighting does not do this, whatever your product is, it will look lousy and the project is unsuccessful. The lighting must make the viewer WANT ONE of whatever it is.
If you’re shooting with speedlights or strobes, set them in manual mode. If you are using continuous lights, they should be the ONLY light sources. No windows, room light, table lamps or anything else. Whatever you choose, purchase all the lights from the same manufacturer. If you do not, and do not have a colour meter as well as the skills to use it properly, your light is not going to be successful. I cannot tell you what to buy, but you absolutely get what you pay for when it comes to lighting.
Background
The background in product photography can only have one of two jobs. Either the background is used to isolate the subject to focus viewer attention or it provides environmental context where the product excels. If I use one of those expensive KitchenAid mixers as an example, a lot of money went into the industrial design, the paint is gorgeous, and the finish quality tells the buyer something about the device. Its completeness and not needing a bunch of other stuff also conveys a message of competence and quality. Putting a well-designed product on a cluttered background is a disaster that ruins all the hard design work. If used in an environmental kitchen shot, there can be nothing else that could draw attention away from the mixer in the shot. If the shot is designed to focus only on the mixer, the background must be neutral and completely unobtrusive. A plain all white background is popular, but it’s been done so much it has become rather staid and boring.
Shoot
- Place your product on the table. Use a cover or other prop to provide isolation or context.
- Place your key light in a position that lights the product nicely but does not heavily light your background.
- Set a small aperture that will give you a bit more depth of field than you need, but never smaller than a couple of stops above the smallest possible aperture on the lens. If you need more depth of field, you will need to shoot for Focus Stacking, to be touched upon later in this tutorial.
- Meter and shoot a test frame and view on the large screen. If using speedlights or strobes, use a flash meter. If using continuous lights, use an incident light meter. These functions are often found in the same device, such as the Sekonic 308. Check for unwanted reflections, stains, spots and marks. Clean the subject wherever needed and do not touch it with bare fingers. Always wear white cotton gloves or nitrile gloves when touching products or props. Your finger oils are bad news, especially if you have glass, plexi, stainless steel or aluminum. Keep making test shots until things are perfect. Get that first light placed and angled the way that you want it and then lock things down.
- Bring in the second light. It has the purpose of filling in shadows created by the first light that are too harsh. It is running at about ¼ of the power of the key light at the same light to subject distance, as a place to start.
- Make test shots in order to do positioning and reflectance testing again. Do not touch the first light at all, only manipulate the second light until you see what looks correct. Lock it down.
- Bring in the third light. Its job is either to wash the background with light or to provide a soft rim light to the back of the product to make it pop off the background. If you use the rim light approach and your background is not black, consider that you will need a fourth light to wash the background. If your background is to be white, you definitely need a fourth light, unless your background is a giant soft box which acts as a white background and a rim light simultaneously. This sounds like a shortcut. It’s not a shortcut, it’s tougher to do this well than to use separate rim and background lights. The purpose of the background light is only to create separation, and this means it should be mostly unnoticed.
- Once you have the lighting the way that you want it, shoot and check the big screen closely for reflections, dust spots, scratches, dents, etc. You may not be able to fix this right now, but you must write them down, so they do not get missed in post-processing.
- If you have exceeded the 7-stop range guidance, set your camera to make three shots at -2EV, 0EV and +2EV compensation settings. You will use these images with your HDR software to construct a single image.
- Your first product image is shot with the grey card or ColorChecker in the frame. If shooting HDR, the device must be in all three shots. If your product has a specific colour, such as the red of a Coke can and you do not use a ColorChecker, you will already have a colour issue. Getting a product colour wrong is not excusable for any reason. You do not need to colour correct now, since this is digital and you can correct in post-processing.
- Now do your shots, either in 3 shot brackets for HDR or single shots if HDR is not required.
- Once you have your preferred exposure, make a series of bracket shots that are -1 2/3 EV, -2/3EV, +2/3EV and +1 2/3EV. These are your safety shots. If you are shooting HDR, use the safety positions as your zeros and shoot the brackets around them.
- Do not strike the set, move a light, a camera or anything.
- Download the images to your post-processing computer and bring them up on a calibrated monitor. If you do not have a workable exposure within 1/2EV of acceptable, go back and reshoot. The calibrated monitor is not optional, it is a requirement.
- Check the depth of focus precisely while zoomed in on a large display. If a critical component is not tack sharp, you will need to reshoot using the practice of Focus Stacking. If you do not know how to do Focus Stacking, please consider taking a class or workshop or tutorial on this practice. Do not stop down to the smallest aperture or change the camera settings otherwise.
- If things look good, power the lights down, and go walk away for 30 minutes or so. Then come back and check the downloaded images again. If they are still looking good, make three copies of them in different places.
- You are now ready to do whatever editing that you need to do. You can use Lightroom for basic cleanup but will need Photoshop for more effective spot and dust removal, proper black and white point settings and the Levels and/or Curves Adjustment Layers for precision work. Lightroom is awesome but the challenge of no layers and no independent masking makes it insufficient for the kind of editing work that goes into serious product photography. Plan on at least five minutes of edit time for every minute that you spend shooting. If you finish your edits way ahead of the estimate, you have missed something.
The Hard Stuff
Up to now, we have touched on the basics of shooting products successfully. We haven’t really discussed the products so far. As you practice, and you must, start with simple things in simple shapes that are easy to light. Avoid metallic products, clear glass, highly reflective subjects and anything that is going to create real lighting challenges such as crystals, gemstones or products that have high indices of refraction such as fired ceramics or lead crystal glassware. Kids toys are excellent practice elements. A plain old-fashioned rubber ball, or an egg in an egg cup make awesome practice subjects.
Coming Up Next
In part 2 of our product photography tutorial, we dig into some of the gear listed and cover the purpose of these pieces.
What other photographic or video tutorials might you want to see? Share your thoughts in the Comments, and let us know if you have questions on this or any other subject.
Until next time, peace.
COMMENT (1)
Pingback: Product Photography: Part 2 | Henry's Blog