Have you ever felt that your landscape shot didn’t really capture the scope and breadth of the story you wanted to tell, but when you tried an ultra wide angle lens, everything looked really far away and seemed diminished?
You aren’t alone. In the olden days (self jab there), we had dedicated cameras like the amazing Widelux that only shot panoramas. With our digital cameras, things got a whole lot easier.
You may have already made some panoramas using your smartphone. Despite the micro sensors and the fact that they are JPEGs with substantial data loss, they still can look pretty darn good and they are super easy to shoot. When you get one of those images printed, they can look very impressive.
In this article we’re going to learn to make panoramas using the DSLR or Mirrorless camera that you already own. It’s really very easy and can be done with a tripod or even handheld. You will need some software to stitch the individual images together, and to take you through that I will be sharing the steps in Adobe Lightroom.

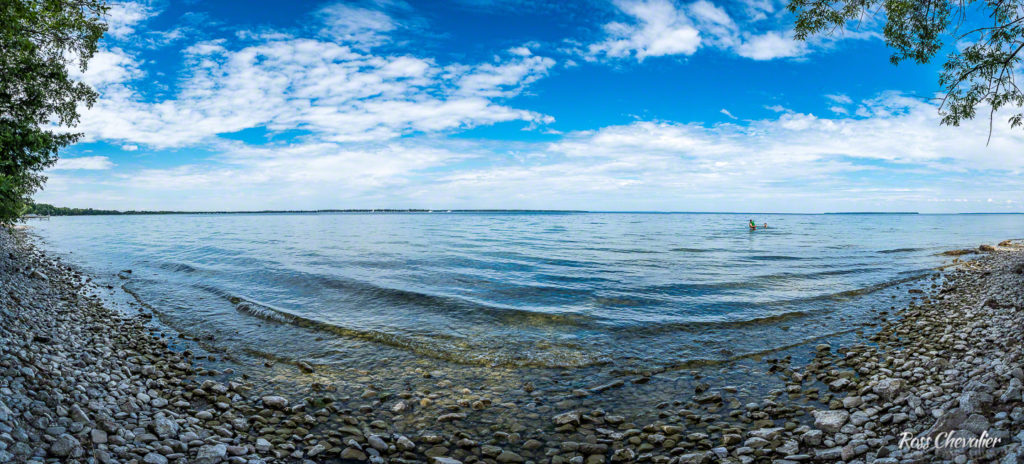
Figure 1 : A simple panorama shot with a Fujifilm 16-55 mounted on a Fujifilm X-Pro 2. 10 frames at 1/250 f/16 ISO 200
You need some very basic skills to shoot a panorama. You need to know how to read the light meter in your camera, and be able to make those settings in the manual mode. You need to know how to lock the autofocus and then switch it off. You need to be able to choose a small aperture. Told you these were pretty basic skills. Let’s go through our steps to make a beach panorama. In this workflow, I will be using a tripod, mostly because it makes things easy.
It’s quite common to think about using a wide angle or even an ultra wide for panoramas. That’s understandable, but I’m going to suggest something different. If you are shooting full frame, this is a great scenario to use your 50mm prime lens. If you are shooting APS-C, you want to be in the 35mm focal length range and if you are shooting Micro 4/3s, you want to be in the 24mm focal length range. There is no problem with using a zoom lens, just make sure that the focal length never changes during your panorama. I keep strips of gaffer tape on my tripod legs specifically to prevent zooms from moving in long exposures and during panos. When I am done, I peel the tape off the lens barrel and put it back on the tripod leg. Easy peasy.
- Get your camera ready, making sure you have a clean memory card and a fresh battery. Panos require many images and you will be inclined to try several times for different looks
- Manually pan the camera left to right to get a sense of the subject matter, where you might start and where you might stop. When you are doing this pan, I strongly advocate that you hold the camera vertically, in what we call portrait mode. This may sound a bit counterintuitive, but trust me, it works out better.
- Mount your camera to your tripod in the vertical orientation. Lock off all movements except for the panning capability.
- Since the ground is rarely level, you will need to level the camera. Many cameras have built in digital levels and they work very well. I’m very old school and I carry in my go bag a small bubble level that slides into the hotshoe. Bubble levels are easy to read and are large enough that the state is easy to see, even when the light is not ideal. Use your level and the non-panning movements on your tripod head and legs to get the camera level. Now pan and watch the level to ensure that the camera does not come out of level in the pan. If your gear is decent, it won’t.
- Connect a remote release to your camera. I like the inexpensive cabled release style rather than radios, and I never use those flat little infrared triggers because they never work consistently for me and thus become frisbies. I actually have a Ziploc in the bag with the Essentials releases for a number of camera fittings. With three of them, I can trip shutters on just about anything. The Essentials releases are reliable and if I happen to lose one, I’m not out hundreds of dollars. I’ve lost remotes before. You may be smarter.
- Engage the light meter in whatever mode you are shooting, I suggest aperture preferred, and set an aperture that will deliver deep depth of field. Try f/16 for a start. If it’s a reasonably bright day, set your camera to its lowest numeric ISO. Now make note of the shutter speed that the meter suggests when you are pointing the camera at the most important element that will be in the frame.
- Switch the camera to manual exposure mode. Match the settings you just had for ISO, Aperture and Shutter Speed. We do this so changes in reflectance as we pan doesn’t changed the exposure with each frame because that is going to very visible.
- Since most panorama stitching software was designed by humans who read left to right, the software often works best when you shoot from left to right. Sounds silly, but what’s the harm? Position your camera pointing at what will be your first frame.
- Hold one finger up in front of the lens and take a shot. Remove the finger and take the first real shot of your panorama. This finder trick will help you identify starts and stops when you get to the digital darkroom.
- Rotate the camera on the tripod so you are seeing about 30% of the previous shot on the left side of what is in the viewfinder or on the LCD. This overlap helps the stitching software do its job. You don’t need more overlap, in fact it can be detrimental, but you don’t want less either. Your tripod head probably has little marks engraved or painted on it. Once you have identified how many tickmarks of turn gives you the next shot with proper overlap, you don’t even need to look through the viewfinder.
- Repeat the shoot-rotate step until you reach your final frame, the right most edge of the panorama. Shoot that frame, then hold two fingers up in front of the lens to indicate your stop shot.
Well done! You’ve now shot your panorama sequence! Because you shot in portrait mode, your panorama will not be a long narrow strip and will have better balance and better coverage.
- Go through your normal process to bring your images into Lightroom. Once in, select the first image, go to the Develop module and open the Lens Corrections panel. Apply any Lightroom available correction. If there isn’t one, don’t worry.
- If you applied a lens correction, apply the same lens correction to the other images in the sequence. Lightroom has a SYNC function to make this easy.
- Find the first image in your panorama sequence. If you are using the default structure in Lightroom, it will be the first image after the shot of your one finger in the frame. Click that image, hold down the SHIFT key and scroll to then click on the last image in the panorama sequence. It will be the shot before the one of two fingers in the frame. You have now selected all the images that make up your panorama. On the first image you selected, what Lightroom calls the “most selected” right-click and choose Photo Merge and select Panorama in the callout that will appear. Since you are shooting off a tripod you can leave all the checkboxes blank.
- In very short order, Lightroom will build your panorama for you. You can now use your normal Lightroom editing techniques to finish the image.
- BONUS OPTION : If you have a printer that can take roll paper, you could now make yourself a long pano print and get it framed for your wall!
So there you have it. The basics to make a simple panorama using the camera that you have and process it in Adobe Lightroom. You can certainly get more in depth on doing panoramas and you can engage with more expensive gear, but you don’t have to. In fact, once you have practiced a bit, you should even try making panoramas where you are the tripod and your waist is the panning head. Lightroom does a pretty amazing job at alignment and the new Boundary Warp feature can address edge inconsistencies. Both panorama and boundary warp are available in Lightroom as part of the Creative Cloud Photographer’s Bundle.
Now it’s time to get your gear together and go make some panoramas!
Until next time, peace.


