
Do you edit your photos or videos? Do you enjoy spending time in the digital darkroom or the digital editing studio? Do you want your images and films to look the very best that they can?
If you answered “yes” to any of these questions, then this article is going to be very important to you.
Screen calibration means applying a colour correction profile to your display settings to help ensure consistency in exposure and colouration from image to image and also, and perhaps more importantly, to ensure your work looks right when it gets posted online or printed.

Computer displays are a lot like televisions. When we get one from the store, the brightness, contrast and saturation are usually cranked right up to make the displays pop and really draw your attention. When you get the item home and fire it up, your retinas start wailing because looking at the screen hurts.
Some displays even specifically offer a “demo” mode designed to be eye-catching and retina searing. However, in reality, none of these settings are suitable for successful editing. The use of the word successful is not a typo. Editing on an un-calibrated display means that the only thing you can be sure of is that your edit looks ok on your particular display.
Let’s presume that you want the best possible output. If you don’t, well then calibration isn’t going to be something that you will care much about. You want to have your display at the proper brightness, contrast level and colour balance so when you put a lot of work into your work, it looks great everywhere else. While it is true that you have no control how others will be viewing your work, you owe it to yourself to deliver the best work you can.
All displays need regular calibration. You can get very inexpensive colour calibration tools that will set the colours right, but these entry level devices leave out the critical element of screen brightness. Most screens are set much too bright. If you, or someone in your household plays video games on the computer, I guarantee that the display set for gaming is pretty much useless for editing. They are two completely opposing deliverables. The display is arguably the second most important thing that matters to ARK gamers (after finding the right hosting at https://arkserverhosts.com/), so make sure you get it right!
What you want is a calibration system that uses a colorimeter and special software to measure the ambient light, measure the screen brightness and contrast and measure colour rendition and use this information to create a display profile suitable for editing. Sadly, many displays today lack physical controls for brightness and contrast or if they exist, they have limited range. It’s also common to find display systems that adjust for the level of ambient light. While convenient for general use, this is anathema to the serious editor because changes in brightness and contrast change the entire response spectrum of the display. Fortunately, this is not so hard to rectify.

Datacolor Spyder X Elite
First you need to get yourself a quality colorimeter kit that measures screen brightness and ambient light. X-Rite and Datacolor both deliver very cost effective solutions to the problem, but be aware that neither brand’s entry level product does brightness management.
While these units provide an improvement, I have seen too many situations where an overbright screen results in an edit that everywhere else looks dark and muddy. My recommendations to you are either of the X-Rite Colormunki Display or Datacolor Spyder. Both are available widely, and as you would expect, through your local Henry’s store or Henrys.com (More information included at the end of this article).
Where you choose to edit should have very consistent illumination and not be too bright. Never have room or window light fall directly on your screen. Doing so will cause you to turn the screen brightness and contrast up too high. A reasonably dark location is best overall. I understand that in many residences, this can be challenging so many folks use cut pieces of black foamcore from the stationery store to make a hood for their display. This is a good idea and many pro editing displays include hoods in their purchase price.
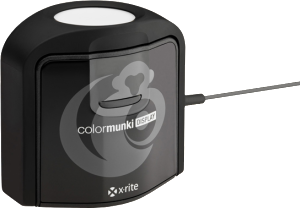
X-Rite Colormunki Display
Next turn any auto brightness controls off. These are most common on laptops but exist on some desk still computers as well.
Connect your calibrator and launch the software. You will be prompted by a series of steps to measure the ambient light and then to position the calibrator on the screen. All calibrators tend to hang in front of the display on a weighted wire. Tilt the display back slightly to ensure that the calibrator is in solid contact with the display.
Higher quality displays will take longer to calibrate because they will have more fine adjustments. You will often be asked to adjust screen brightness and contrast at the beginning of a calibration so learn how to do this on your display before launching the calibration software. You may find that your screen will remain too bright no matter what you do. Better calibrators can take this into account.
Once the calibration is completed, you will be prompted to save and activate the new profile. Do so and compare the profile to where your display started. Most of the time the correction is very far from the starting point. You will be prompted for a recalibration interval. Do a calibration at least once a month, and on demand if the lighting conditions in the room change. If you edit on a laptop in a variety of different conditions, it is to your advantage to take a couple of minutes to calibrate your screen in each location before your editing session.
If you have multiple displays, your calibrator can build a unique profile for each display. These profiles take the form of an ICC profile (International Color Consortium). Depending on your operating system they are stored and activated differently, fortunately your calibrator may automate this or provide you step by step instructions for activation.
If you decide that you want a display for editing, there are a few things to look for. You want a display that is IPS or PLS rated. IPS stands for In Plane Switching, PLS stands for Plane Line Switching, and either one is necessary for consistent calibration and wider colour gamut. Your generic PC monitor is more likely a TN or VA display and while fine for basic computer tasks and perhaps even for gaming, will not have the colour range and depth needed for accurate editing. It would be perfect after you upgrade PS4 Pro SSD for that, but for editing purposes? Not so much. Good news though, IPS panel prices have dropped significantly and are no longer priced out of reach for us regular folks. This means that people are able to purchase such screens for normal computer tasks and gaming at cheap prices, but as we have stated over and over, the screen calibration is paramount for an enjoyable experience. For example, if you were to download something like this persona 3 rom, you’ll find the screen calibration and the aspect ratio must be set correctly, especially for ROM emulators, as an incorrect aspect ratio could mean that you might only be able to see a part of the game screen or perhaps nothing at all. You’ll want to ensure whichever screens you’re using, for whatever tasks, are set up as they should be to gain the most from the visual display.
Also important but often harder to discover is the colour gamut efficiency. You want at minimum 99% or better sRGB coverage, and in an ideal choice you want 99% or better Adobe RGB coverage. A wider colour gamut capability means a lower chance of being surprised with the output. RGB coverage is very important when editing for prints, even though the print may end up as a JPEG file in sRGB if sent to an external print service. If you have unlimited funds, the EIZO line of displays are impossible to beat. You won’t like them for gaming but for editing, they are top of the line. It’s very likely that you will have a professional business that will generate the funding for one of these displays.
Tablet displays like the Wacom Cintiq line are also popular with artists and editors, just be sure you are getting adequate gamut coverage if you elect to use one of these devices.
Earlier in the article I recommended two options for good quality screen calibration devices that handle brightness settings and ambient light measurement:
X-Rite Colormunki Display
Datacolor Spyder
Both are excellent units and the minimum I would suggest. If you wish to do custom paper profiling, you are into a different game and investment point entirely, so email me if you have questions on that more esoteric subject.
There’s no point in serious editing if you don’t know that your output is going to be correct elsewhere. Adding a calibration tool to your kit will help differentiate you by delivering more accurate and more consistent work.
Until next time, peace.


