This post has been brought to you with the help of Canon.
Making sure you have the right camera is an important part of getting started with the great hobby (or eventually profession) that is photography. There’s always a great deal here or there on a new camera body, usually including a basic kit lens, and sometimes including one or two others. For many people, this introductory lens might just be good enough. I’m quite sure that most of the people who think that way just haven’t yet had their eyes opened to the world of possibilities that comes with their next lens purchase.
The truth is that cameras record the image, but the proper lens is essential to great photography. In a world that is all about light (because everything we see is really just light reflecting off of things back into our eyes) having the right lens for the right situation can make or break your shot. Did you know that there have actually been studies that found that more than half of the people that buy their first SLR don’t even know that the lens is removable… and some of them don’t even know you can put additional lenses on your DSLR.
Now don’t get me wrong, I’m not sitting here writing this article all about lenses in an attempt to get you to buy the latest and greatest. That decision is completely up to you. What I want to achieve here is to let you know what is possible with different pieces of glass. When I first discovered what I could do when I broke away from my kit lens, my mind was blown. Myself, I started out with a Canon 20D as my first DSLR, and it came with a 17-85mm f/3.5-5.6 IS at the time. I loved this lens to death, because it came packaged with my first foray into digital photography (not counting the tiny point and shoot I used for the six months previous). I pulled off some very impressive shots with this lens, but it quickly became evident to me not that it wasn’t good enough, but simply that I wanted to do more. So, I started experimenting with other lenses.
Thankfully, I was working as a sales associate at one of the Henry’s retail stores at the time, so I had ample opportunity to try out many different lenses – and one of the first ones (that I knew I could afford at the time – I was still in school, after all) was the Canon 50mm f/1.8. The Nifty Fifty, as it’s commonly called, opened my eyes right up! All of the sudden I couldn’t zoom, but that taught me something about shooting. All of the sudden I had a much brighter aperture, so I could shoot in so many different lighting situations. All of the sudden, I had a better portrait lens, giving me those nice and smooth blurred backgrounds. All of this, from a new lens.
So for me, when it comes to considering which lens to purchase next, I typically look at what it can do for me, and why I would need it. As a wedding photographer, every lens that I’ve acquired since starting out with digital photography now has a purpose for me, and lets me capture images that I would never have been able to capture before. Let’s go through a couple of those situations so you can see what I mean.
Sports
Shortly after I picked up my first DLSR, my younger brother started playing paintball. He played on professional level teams, so this meant he had the best paintball guns and all of the gear they need. The best paintball guns are those that offer a further range and a more accurate shot, they want to be able to find the other opponents at a moment’s notice to claim victory for their team. It is because of this that things like airsoft rifles are one of the best options for paintball players who have the intention of winning for their team. The team trained even more and improved their talents on the paintball field. They got so good that they started getting into the more high tech equipment like portable paintball compressors and amassed a pretty impressive kit. Naturally, as an opportunistic creative, I saw this as a great chance to show off and try out my skills as a sports and action photographer. It didn’t take long for me to realize that clearly I didn’t have the best gear available and my kit lens just wouldn’t cut it. It didn’t have the focal range or the larger aperture that was necessary to capture some of the paintball matches I would be photographing. This would be true when photographing a range of shooting sports, including airsoft. Airsoft is another activity that yields excellent photos as it’s such a dynamic thing to do. Some friends of mine got into it a few years back and it looked a lot of fun. They sent me a link to the Only BB Guns website – who claim “we have the best airsoft prices in the UK” – as they thought I should come prepared if we were to duke it out. I think they underestimated my airsoft abilities as I showed them up, to their despair.
I knew which lens I would navigate to next, and a telephoto zoom like the 70-200mm f/4 provided me with enough range and flexibility to capture those fast plays and quick-moving players on the field. Now, there are IS (Image Stabilized) and f/2.8 versions of this lens available, but for someone who was just starting off, I wanted to go for something affordable yet of amazing quality.
Paintball is played both outdoors and indoors in Canada (darn that winter), so having a lens that is capable in low light situations became very important to me. For summertime sports and other outdoor activities though, you might need a little bit more range. That’s where a lens like the 70-300mm f/4.5-5.6 DO IS USM comes in. The aperture, as you can see, is a little smaller, but not by much. Where this lens really shines is with the image stabilization. Whether you’re shooting your child on the soccer pitch, or your teenager snowboarding down the hill, a great range of zoom helps you to get up close and capture the finer details, and the IS helps to make sure that those shots will be as sharp as possible.
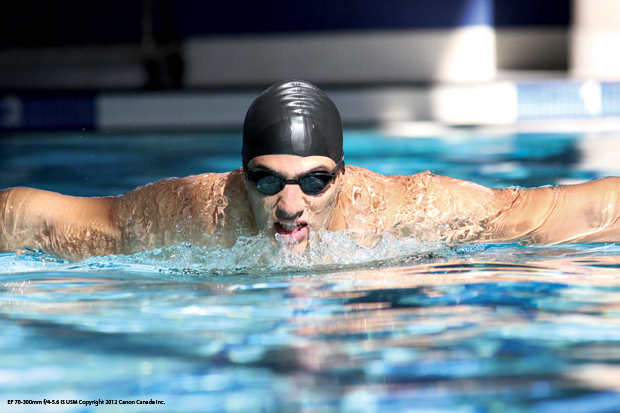
An example photo from the Canon 70-300mm f/4-5.6 IS USM
Close Ups
I’ll be the first person to admit that close-up photos aren’t for everyone. For the longest time, I held off on even trying it out because I felt intimidated by what I thought would be a steep learning curve. Much of that changed when I tried my first Macro lens.
Have you ever found that you’re in your backyard or around your house trying to get beautiful close up shots of flowers or small objects, but for some reason your lens just isn’t able to focus very well on them? The closer you bring your camera to the item, the less likely your lens is to achieve the focus you wanted… All lenses have what is called a Minimum Focus Distance (MFD), or basically it’s the smallest distance an object must be from the lens in order achieve focus. You’ll find that most kit lenses and non-specialty lenses have quite a large MFD. This is mainly because they’re designed to focus faster and perform better for a variety of situations, but of course they might fall short in some special situations.
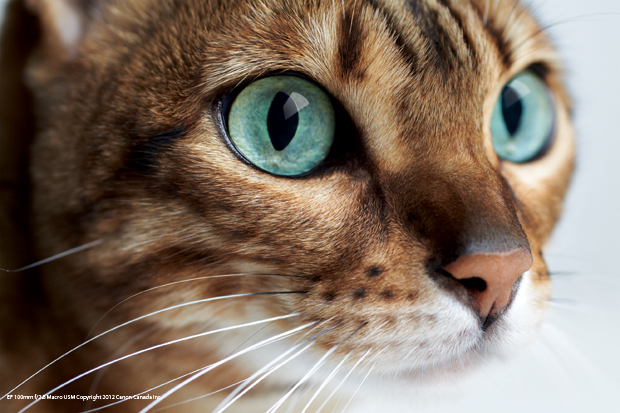
An example photo from the Canon 100mm f/2.8 Macro USM
That’s where Macro lenses come in. These specialty lenses are specifically designed to be able to focus extremely close and get pinpoint focus on a subject. They come in various focal lengths, ranging from 60mm to 100mm and sometimes beyond. Again, as a wedding photographer I find my most use with a macro lens to be when I’m shooting the jewelry and the wedding rings. A standard portrait lens does a great job at capturing these images, but when you really want to be able to see the fine details, there’s no replacing a dedicated macro.
Landscapes
As I’ve already mentioned, what you want to shoot often dictates the type of lens you should use for that situation. It’s entirely possible to stretch a lens’s limitations to make it work for you, but sometimes you might find that it’s just easier to explore the possibilities that are available. Again, you don’t always need to break the bank either just to make a shot work.
Take, for example, landscape photography. Your kit lens (usually an 18-55mm) might just do the job. Ok, so job done… we’re finished here.
Well, not really. While the focal length on your kit lens might certainly be acceptable, sometimes you’ll hit limitations with the level of quality that it is capable of providing. One of the most common things that you might have noticed, but didn’t know what you were looking at is called Chromatic Aberration (CA). This is most often seen as blueish-purple outlines on objects closer to the edges of the image. Essentially, the light is being refracted inside the lens and creating a faint ghost of the object that doesn’t perfectly line up with the object itself once that light hits the sensor.
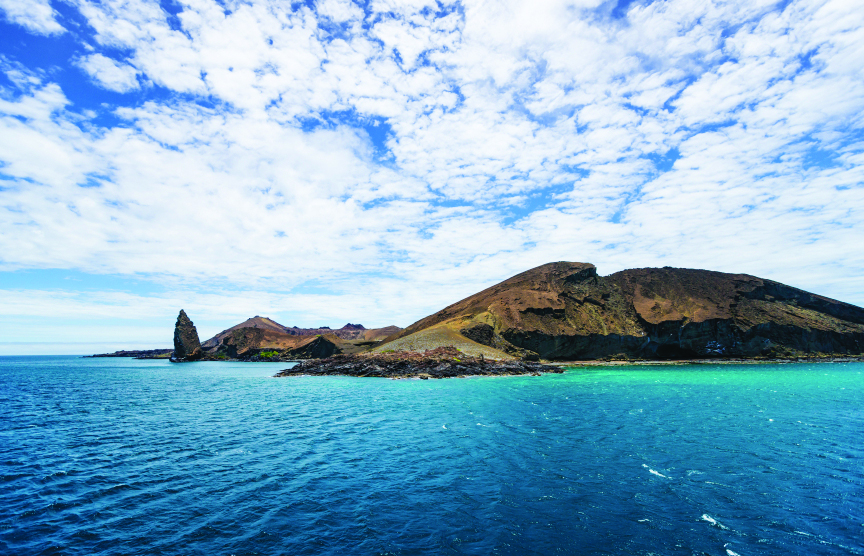
An example photo from the Canon 16-35mm f/2.8L II USM
Sometimes to avoid this, you just need a better lens. Ok, there, I said it… you need a better lens. If you’re shooting with a full frame camera (like the 5D MKIII for example), then you might want to take a gander at the 17-40mm f/4 L lens. The reason for this is that 17mm is a nice wide focal length, and on a full frame camera, it’ll be exactly that – 17mm. There is no crop factor or conversion that needs to be applied to get the actual focal length on a Full Frame camera. On a Rebel-series camera or the 7D – basically anything with an APS-C crop sensor – you should have a look at the 10-22mm f/3.5-5.6 if you still want to achieve those beautiful wide shots for your landscapes. This lens, after the 1.6x crop factor comes out to a 16mm lens, which is still nice and wide. The best part about all of these lenses is that they use improved quality glass and construction, and will improve the overall sharpness and quality of your images.
Portraits
Like sports photography, lenses for portrait photography have longer focal lengths like 50mm, 85mm, or even longer. You might also find that these kinds of lenses have larger apertures – or the size of the opening to which light is allowed to enter the lens and hit the camera’s sensor. This is not only what allows you to shoot in lower light situations, but it also gives your images that soft blurred effect on background and foreground objects – anything that isn’t in focus.
An example photo from the Canon EF 50mm f/1.8 II

An example photo from the Canon 85mm f/1.8 USM
As I mentioned earlier, the first additional lens I purchased after buying my camera was a simple and easy to use 50mm f/1.8. Though relatively inexpensive, it dramatically changed the way I shot, and thought about composition. From there, I eventually upgraded to faster lenses (a fast lens is another way of saying a lens with a large aperture).
Personally, I shoot with a couple of portrait lenses, depending on the look I’m going for. I have a 50mm and an 85mm as my go-to lenses, but every now and then I’ll use another favourite – the 24-70mm f/2.8. There’s a lot to be said about a zoom lens, and many will argue that the 24-70mm isn’t really a portrait lens – and I would agree to a certain extent. Really though, any lens can be a portrait lens if you’re using it to shoot portraits – it just depends on how you shoot them.
The 24-70mm is available in both f/2.8 and f/4 versions, depending on what your tastes (and budget) allow. I love having the flexibility of a lens like this, because at 70mm, it does a great job at flattening the plane of focus and giving a sharp and isolated portrait. At the wider end, however, it’s great for environmental portraits (encompassing the subject in their surroundings) and it’s even great to use for landscapes!
I hope all of this wasn’t too overwhelming! It can certainly seem that way when you take into account all of the options that are available to you. The best advice I can give you is to start with what you know you’ll use first, and then think about what you want to use next. Too many times I’ve seen friends and family (and sometimes customers, when I used to work in the store) get a big expensive lens, only to have it sit in their bag and be used only on a couple of occasions. It’s happened to me too… kind of reminds me of when my parents used to tell me “your eyes are bigger than your stomach!” at dinner time. Find the lens you need, and you’ll use it the most!
So, your homework from all of this is… get out there and shoot – and discover what you could be doing with a newer, better lens!